Quotes

Life is short, break the rules. Forgive quickly, kiss slowly. Love truly, laugh uncontrollably and never regret anything that makes you smile. - Samuel Longhorne Clemens (Mark Twain)

Wednesday, October 31, 2012

Review 4Ground 15mm Europe at War Buildings


While I try to figure out a way to create deeper woodgrain patterns (new tools on the way) on my Battle Flag 28mm Western buildings I thought I would go to work on some other buildings that arrived about the same time. These are 15mm WWII buildings from 4Ground. I have been admiring their buildings for quite a while and I needed some new buildings for my FOW games at the house so I finally broke down and made an order. Rather than review them one at a time I figured I would do the whole lot at once. They don't make the building I really want, a corner building. Essentially an L shape with one corner cut at a 45 degree angle. Some sidewalks would be a welcome addition to the line as well.

I ordered and received five buildings and some stone fencing.
15-EAW-301 – North West European Hotel/Apartments with Coach Arch
15-EAW-302 – North West European Semi-Detached House Type 1
15-EAW-303 – North West European Semi-Detached House Type 2
15S-EAW-103 – Pre-painted North West European Terrace Houses Type 1
15S-EAW-107 – North West European Pre-Painted Shops Type 1
15P-TAO-202 – 1.5m of Stone Walling for 15mm Scale

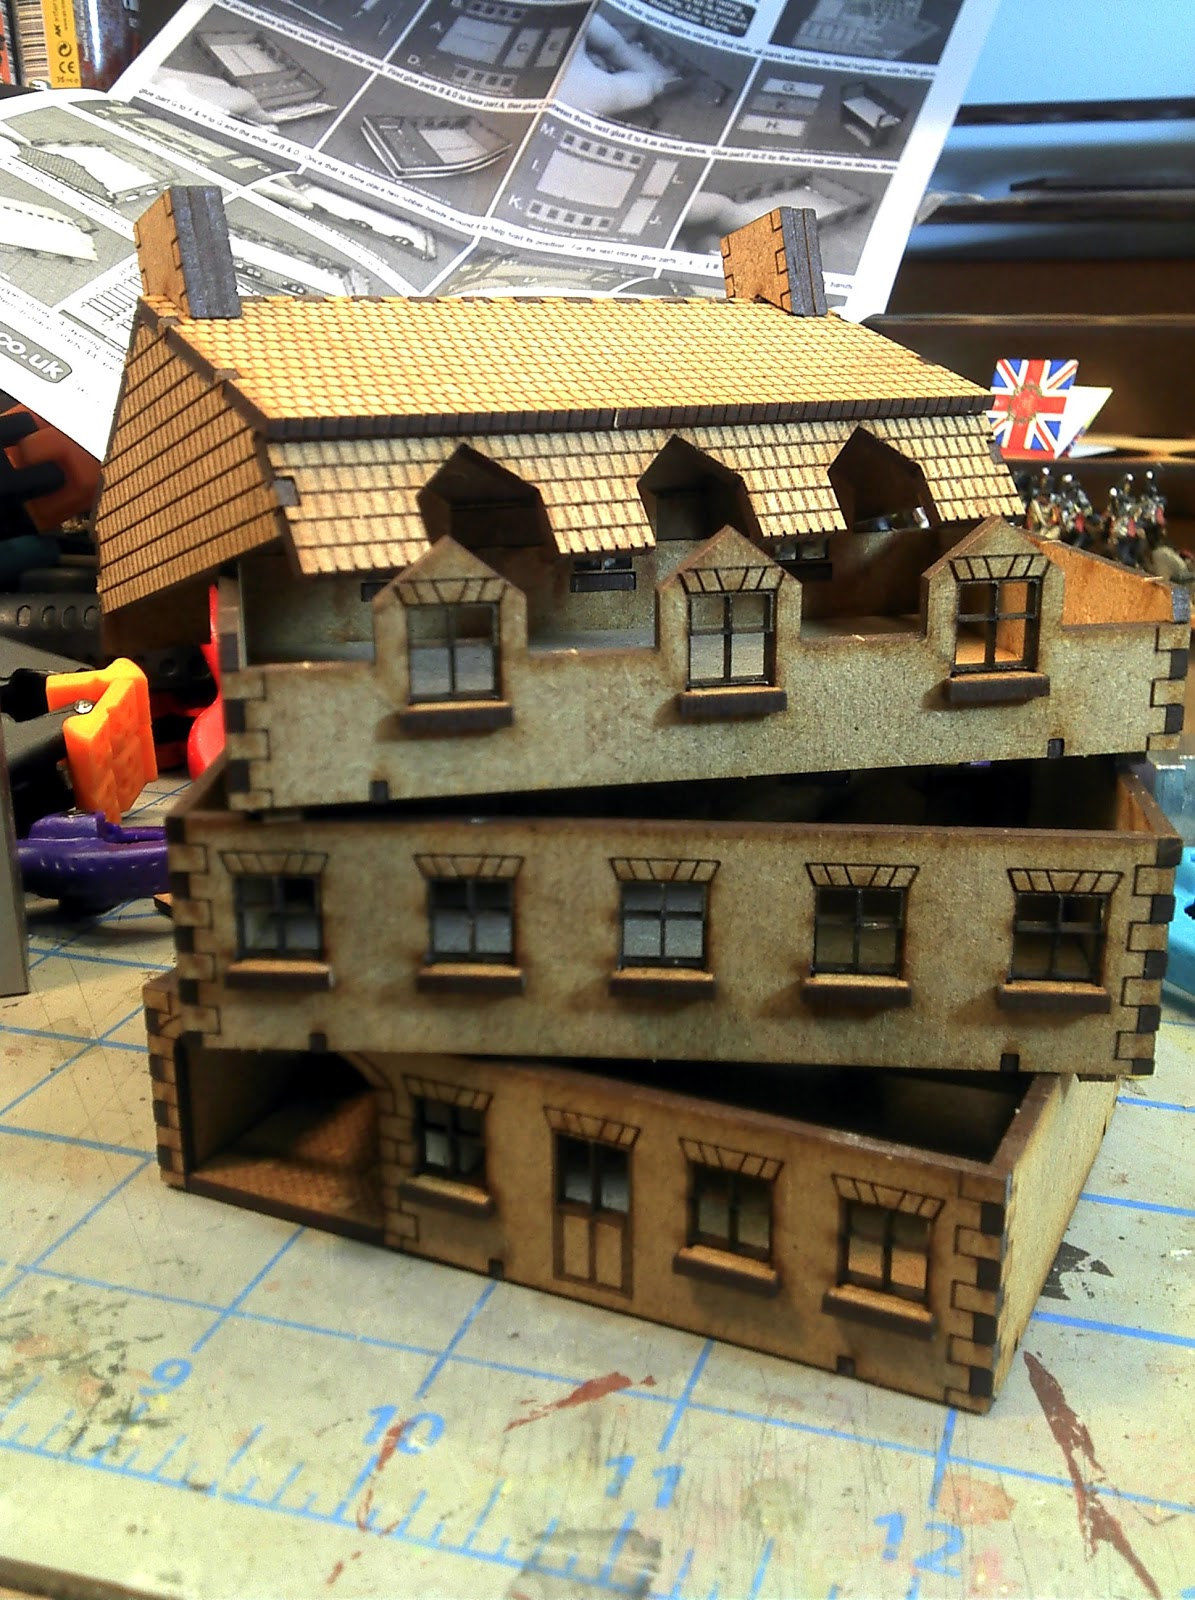
I took construction photos of my progress but that’s a lot of pictures so I’m just going to post some example shots rather than all 60-70 pictures I managed to take during the process. Essentially the assembly sequence for each building is the same. There are only a couple of minor variations, mostly depending on the roof style.

Instructions, for the most part are pretty clear. You receive a black and white set for the unpainted versions and a color set (with posters!) for the pre-painted versions. Each set of instructions is written specifically for the kit you are building, so you don’t have to do any interpretations or search for the sequence that pertains to your kit. I love this! However, there are a few errors on the instructions as far as part IDs. If you are paying attention though you should be just fine, the parts are laid out on the frames in a logical pattern and the pictures on the instructions are pretty clear. The instructions rate a solid 4 out 5.

Components, well it’s a laser kit on MDF, there isn’t much to go wrong here. There are some very delicate parts though. I’m very impressed with the level of detail that has been included. In particular the shop window for the 15S-EAW-107 is simply amazing. I’m going for a full 5 out of 5 on the components.

The pre-painted buildings go together a bit differently from the unpainted buildings that let my really go to town on the clamps! Essentially the pre-painted components are mounted to the building carcass which gives you a lot of depth around the windows and doors. It also makes for a wall that’s twice as thick. That depth is added to the outside of the building so you don’t lose any room on the inside. It also means that the pre-painted buildings have “pin” locators for the upper floors rather than the little squares that have to be added to the bottoms of those floors in the unpainted versions. Still I prefer to paint my own so I’m probably going to buy more of the unpainted than the pre-painted versions.

Like the Battle Flag buildings the ones from 4 Ground are only engraved on one side so all the parts have a back and a front, take your time and make sure that you have the engraved side facing outward so you can see the detail! This is especially true on the pre-painted buildings the interior carcass contains the detail for the doors and windows so you need to pay attention to what you are doing. Also for what ever reason I didn't have any rubber bands in the house and this would have made assembly much easier. I didn't have enough corner clamps to get everything together so I improvised a lot. A small supply of rubber bands would have made everything go quicker. So for these kits my clamps didn't help out nearly as much as a few rubber bands would have.

The stone walls are pretty cool little kits as well. They are a bit fiddly and you do need to pay attention on the 60mm lengths as there are a couple of different bases to accommodate the gate sections. A few clamps to get a good bond are invaluable. Although these came pre-painted I’m going to repaint them anyway. Mostly because of the dark laser mark on the top edge which is very noticeable and at least on mine it feels like the color is a bit washed out and I would like a grayer wall (or maybe brown).

These are great kits and I highly recommend them. I’m looking forward to getting some paint on them. My airbrush is going to get a lot of use in the next few weeks as I work my way through the backlog of buildings that are accumulating on my desk. 


Sunday, October 28, 2012

Its the weather

Colorado weather reminded me last week that winter is around the corner and you really don't know what to expect around here. The first significant snow fall of the season started Wednesday and continued into Thursday, but by Friday it was warming back up and we have enjoyed 60 degree weather and sunlight all weekend. I really intended to paint today but its just to nice outside for that. I'm off enjoying what will start being our last nice weather for the season. Have a great day! (no pressure)

Thursday, October 25, 2012

Review - Battle Flag - 28mm Western Buildings - The Photographer's Studio and House

The Old West Photographer's Studio and House is the last of the three kits that arrived from Battle Flag earlier this week. I saved this one for last because it appeared, out of the box, to be the most complicated of the three kits. Especially since the General Store and  Saloon are essentially the same kit at least as far as construction is concerned. Having pretty much followed the assembly instructions on the first two kits I knew there were a couple of steps that I would be approaching differently. From my way of thinking they make the assembly just a bit easier to deal with. I built this one away from home last night and the lighting was not terrific but I managed to struggle through and got this one together in about and hour and half. The most difficult part was working on the second floor (yes, and I made a mistake here as well). Battle Flag recommends that all the pieces get painted first. I don't do paint first because some of my weathering techniques work better if I can apply them all it once. If you aren't going to get into heavy detailing and weathering then I would definitely paint everything first, it will save you a lot of time. You will have to be careful not to get glue all over the place.

First up is my picture of the contents of the package. Like the General Store, everything was already punched out of the frames and bagged up in zip-locks and marked for me as well. Although I kind of miss punching stuff out of the frames, this keeps the package smaller and lighter for shipping.

The instructions for the photographer's studio are specific to the kit, which I like a lot better. The General Store and the Saloon used the same instruction sheet and I just didn't like that. Like those kits the first piece to get built up is the roof. Construction was the same (lots of clamps!) and I got the gables on the correct ends (2 out of 3 not to bad).


After the roof I moved on to gluing all the door and window frames on. This one has a lot of windows so it was a bit time consuming. I did use a lot of clamps again. This step also included the little bit of extra trim that goes on the top of the facade. Very simple nothing like the more complex facade on the General Store. No problems here.


The next step is suppose to be assembling the front porch which includes gluing on the boardwalk to the front of the building. I have found it awkward to assemble the four walls together with the boardwalk attached like I did for the Saloon. So I opted to skip this step since there is nothing here that would hinder the assembly of something else. Instead I moved on to the base and glued on all the foundation support pieces. Again, take your time and make sure you have the pieces in the right place. This time I wasn't paying quite as much attention and during the dry fit stage I swapped the foundation pieces for the front and back steps. I noticed my error when I pulled the pieces back off to add the glue. The pieces that support the boardwalk only have detail on one side and the detail should be facing out, really it looks better that way.


With all of that out of the way it was time to assemble the walls onto the base. Again it is important to do a dry fitting and make sure you have the technique down. I think I have a better technique though, but I need to try it out before I wax poetic about it being superior. It is much easier to assemble without the boardwalk attached to the front. This step is getting easier each time I do it.


Now with all the walls together I built up the front porch. A pretty simple step, again remember that almost every piece as a front and back and you want the detail facing out. I didn't glue on the porch roof because it will interfere when I paint the building later on.


Time to go indoors. Like the other two buildings this one has a floating floor which requires some bracing to go along the inside walls. With a two story building you have to reach in farther so if you have big hands like me this can be a bit tricky. I followed up byh gluing down the floor, remember don't put glue on the edges! Now I'm trying to figure out how to get the supports in for the second floor at the right height. Well, Battle Flag thought of that and provided a nifty little piece that you can use to make sure all the second floor supports are at the right height. This made life much easier! Well, right up to the point when I realized that I reversed the locations of the two support for the back wall. Fortunately I figured it before the glue had really set and I was able to re-position them and get those pieces in the right spots.


At this point I popped the roof on to get that "complete" look and I was done.


This was another great kit from Battle Flag. I can't recommend these buildings enough and I'm definitely going to be picking up a few more. The only complaint I have at this point is the lack of interiors. However, Battle Flag did tell me that they have the first of their interior kits coming in November. They were talking about dollhouse quality furniture so I'm a little worried about the price point on these. As an alternative Frontline Wargaming makes a lot of resin castings for interiors that look pretty good. I'll probably buy a few of these to check out the quality and see how well they go with the Battle Flag buildings. I'm also looking forward to getting the buildings from Sarissa Precision and see how they compare. Sarissa has a line of adobe style buildings that look quite intriguing, but the first building I have coming from them is the Livery Stable, a very important building in western towns and one that's not available from Battle Flag.